Saturday, August 24, 2013

Why buy when you can build - DIY Radiator Covers


Oh radiators, how I love thee. Free standing, cast-iron radiators first made an appearance in the 1860's and let me tell you, the ones in our house look to be about that old....

I've always loved the character of exposed radiators; however, when we installed the new flooring we needed to make a decision....

We could shut off the heat and temporarily move the 100(+!) year-old broads, or cease the flooring at the radiator feet and build a cover to "hide" the fact that the flooring didn't go all the way under the radiators. 

Usually, I'm not a fan of going the "short cut" route, but once our plumber started talking about how many full-grown men he'd need to help him carry these bad boys out of the house, my wheels started turning.

Lord knows we don't need to suddenly have 10ish non-functioning radiators, or several broken toes, or a broken back, or any slew of the aforementioned combinations....

SO

We decided to go the radiator cover route and as serial DIYers, we sure as heck wouldn't be BUYING them.

Andrew researched a few options and ultimately decided to build a pretty simple box, trim the bottom with quarter round and purchase pieces of decorative metal for the front. He used solid pine lumber, and then painted the radiators a crisp white.We will eventually put the same quartz we purchased for the kitchen counters on the top of each radiator cover for a more finished look.

For now, I've spruced them up with a few decorative accents (pictures below!).

For more information on how to build an awesome radiator cover, check out this link:


Picture Time! Our DIY radiator covers, handmade by the talented Andrew Dylewski ;)

Dinning Room (still needs to be painted):


Hallway:


Kitchen:


Monday, August 19, 2013

Hubs + Fire pit = S'MORES!

A few weeks ago, Andrew got the brilliant idea to build a fire pit in our backyard.

I'll be honest, I wasn't totally sold on the idea, simply because I'm not the biggest "outdoors woman". I don't like being too hot, or too cold, or rained on, etc.

I do, however, like to eat s'mores.

SO....I  agreed to let him dig a giant hole in the yard.....

And, I've gotta say, it looks AMAZING!

Huge "shout out" goes to Gio for spending his weekend helping Andrew get this thing finished :) What can I say, we've got amazing friends!

Our fire pit fun can be found below - happy marshmallow roasting!

Framing/retaining wall built:


Side picture of the pit (waiting on surrounding stones):


Front (still waiting on stones):


All finished (wine and all!):


Sunday, August 18, 2013

Bedroom Makeover on a BUDGET ($1,500 - or less) - Part Two!

A bedroom certainly isn't complete without a BED! For a while I had my eye on this:

http://www.ballarddesigns.com/louis-bed/furniture/beds-daybeds-beds/10613?defattrib=&defattribvalue=&listIndex=5

However I wasn't really digging the price point, nor the fact that it isn't available to ship until the middle of October.....

So, I started scouring Craig's List for something similar. If you can believe it, the hubby found a vintage Thomasville canopy bed for $60.00(!). As luck would have it, our bargain find shared many of the same features as the Ballard bed shown above (wicker, delicate legs, french country feel).

The bed arrived in excellent condition, but was in need of a serious makeover. We primed and painted the bed to give it a fresh look (using the lighter of the two colors that we used for the dressers).

Before (I was a wee bit overzealous and forgot to get a "true" before, sans any primer):


During (bottom half has paint and primer, top just primer):


After!:


Due to limited wall space, we angled the bed in the corner of our room. We loved the way the placement of the bed made for "better flow"; however, we weren't having an easy time finding a nightstand for Andrew's side of the bed.

Then....we stumbled upon this gem:


It's a vintage "smoking stand", which was a piece of "novelty" furniture popular during the depression. Smoking stands provided a place for folks to place their cigars and cigar supplies. Ours is copper lined (the copper protected cigars from humidity) and it also has a place for an ash tray. I was able to find a little lamp that fit perfectly in the "ash try" space, so now our nightstand is complete!

We purchased the smoking stand at an antique store. The piece was priced at $40.00, but the place was cash only and I only had $28.00 bucks on me.....SO... 

We offered the guy $28.00, and to our surprise, he accepted!

We've decided not to refinish the smoking stand, because the color already works with our room, and I truly love the rustic patina.  

Budget Breakdown:

* Bed = $75 ($60 + $25 delivery charge)
* Nightstand = $28
* Lamp = $18
* Bedding (duvet, duvet cover, three accent pillows) = $150.00

= $271.00 ( roughly $700 remains!)........


Sunday, August 11, 2013

Bedroom Makeover on a BUDGET ($1,500 or less!) - Part One...

Please take a moment to marvel @ FHL's new look (....OK....that was enough marveling, thank you!)

For those of you who know me, technology isn't really my friend. I've been following several other DIY blogs, trying to figure out how to make farmhouselove a bit more gorgeous - mission accomplished! I'm super thrilled with the damask background.

In other news, we've been slowly making over our bedroom, one piece at a time. With all of the renovation expense, we wanted to keep our budget in check on this project. After much debate, we set our budget at $1,500.00 total (this number needs to include all furniture, accessories, rugs, etc.).

Over the next several blog posts, I'll be piecing together our new bedroom look, with the BIG reveal coming SOON! (coming soon because, truthfully, we aren't finished ;)!

Our search for a great find(s) began at a vintage furniture store in Lawrenceville (http://www.pittsburghfurniturecompany.com/).We happened upon two amazing pieces ($400.00 total, including delivery!) both in need of refinishing (badly in need of refinishing!):

Tall Dresser Before:


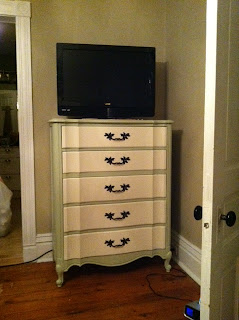
Tall Dresser After (please excuse cords, etc. - NOT the final look!):


Long Dresser Before:


Long Dresser After:


We used BEHR premium plus exterior paint (more durable than traditional latex) in a stain finish. We decided upon two colors from the Martha Stewart line (I like the contrast of the light drawers against the colored base).

We did not sand the pieces, but we applied two coats of primer before painting. Trust me DIYers, primer is your BFF :)

 Budget Breakdown (post dresser project):

- Dressers = $400.00
- Paint (two quarts, one of each color) = $30.00
- Primer = $0.00 (left over from previous projects)
- Mirror (to add height to long dresser) = $35.00
- Sconces (to flank mirror) = $25.00
- 1 can oil rubbed bronze spray paint (dresser hardware and sconces) = $8.00
- Other accessories = reused from various rooms in house

.............roughly $1,000.00 remains!........

If your enjoyment, some "action shots":